Image Map
Showing posts with label bullentin board ideas. Show all posts

Monday, July 28, 2014

Monday Made It - It's a Traffic Light!

It's time for another Monday Made It. This week I made a traffic light for the school's welcome bulletin board. Be sure and check Tara's blog 4th grade Frolics for other great "Made It's".


Saturday I went over to school to work on a couple things for the school's welcome bulletin board. This year the welcome display is going to have a racing theme. “Racing off to a great year!” I have a few more things to make, but those will have to wait till the teachers return. (I need their pictures!) I'll post a picture of the finished display as soon as it's complete. As part of the display I wanted to make a traffic light. I checked the teacher idea box – otherwise known as Pinterest – and found a few ideas. Of course I had to change it up a little. Got to use what’s one hand. My light:


To make my light I used:

3 ice cream buckets from Wal-Mart. The rectangle shape worked great.

White Christmas lights

Black construction paper

Black poster board

Small piece of red, yellow, and green tissue papers

A boat paddle

Bucket of rocks

Lots of hot glue

Duct tape –

Carpet knife and scissors


 Step One:

Duct tape the 3 ice cream buckets together. It doesn’t’ matter what color you use. With the carpet knife I cut hole in the back of the top bucket to feed the Christmas lights into the buckets. I also cut small holes in the bottom of the top and middle sections of the traffic light. The carpet knife sliced the plastic like butter.


Step two:

I took the black poster board and made the front and sides of the traffic light. To make it look like a traffic light, I glued tissue paper on the inside to make it look like a traffic light. I hot glued the poster board to the ice cream tubs and had the top part of my light.

*Hint* If anyone else makes one of these, don’t glue to front of the light on until you have already attached the light to the stand. I had to take it off to connect it to the boat paddle.


Step three:

Create a light pole! I used a boat paddle. That’s what I had. Didn’t figure the boys would use it in the next month or so. If you are going to use this for a long time, use a piece of wood or thick PVC pipe. Mine was meant to be temporary. I wrapped the paddle with black construction paper and scrapes from the bulletin board paper in the library.


Step four:

 I placed the stand (boat paddle) in a bucket, filled it with rocks to make it sturdy. Another mistake I made was attaching the light to the upright paddle.* Hint* I would advise attaching the traffic light to the stand before you place it in the bucket of rocks. I almost burnt a couple fingers in the hot glue. Ice cream buckets are made of very thin plastic. I could feel the hot glue melting the buckets as I attached them to the paddle. Make sure to watch the placement of the cords to the Christmas lights. You want to be able to plug them in after all this hard work. My finished traffic light!!!  I'll tape the extension cord to the back. It will only be on during open house or special occasions. Don’t want to get into trouble with the fire marshal.


Go check out other great Monday Made It’s on Tara’s blog! Might find something you just have to make for your library or classroom.

I need to go by school and shelf those books. That was my "read it"  stack from last week.

Wednesday, May 21, 2014

Preparing for Summer Break

Today I finished taking down my last bulletin board. It's actually in the hall outside the library. I usually keep it uplifting and welcoming as it's the first bulletin board visitors to my school see. This past month I had a tribute to our 8th grade graduates.
 
I decorated the whole wall in our main hall with oversized flowers.  To give you an idea of just how large, each petal on the daisies and the tulips uses one piece of construction paper. They were really easy to create. 


Behind the glass I made a paper rose for each 8th grader. The roses had a student immerging from the center. Our students can choose which high school they want to attend. My students usually attend West or South. I have one student going to the "city" high school. So each student is blooming from a flower color that reflects their high school. Made a colorful display with yellow, blue, green, maroon and white paper roses. My students loved it! Had a few shout-outs from parents.

I found all the instructions for these 3D flowers on YouTube. I just made my flowers bigger with large sheets of paper.
Daisy- https://www.youtube.com/watch?v=v7GIQa9EE-4#aid=P9oK3hJGVjA
Daffodil - https://www.youtube.com/watch?v=i0n57UoGwVo
Tulips - https://www.youtube.com/watch?v=T0ooIo7xJRA
Scrapbook flowers - https://www.youtube.com/watch?v=qht388myRL0
coffee filter roses - https://www.youtube.com/watch?v=7YCN8GSnIiQ&index=9&list=LLeihdJMaNBLllU9EdzoYtBw
White flowers inside glass -  https://www.youtube.com/watch?v=csmWNjVAVyg&list=LLeihdJMaNBLllU9EdzoYtBw&index=6

I forget where I saw the idea of the grape hyacinth. It's really easy. Just one inch wide strips of blue paper looped and then taped the wall.

The feathery flowers were recycled from my truffula trees on the previous bulletin board. One of my students asked me today, "What are you going to put up for us in August?" I told them they would just have to wait and see. Goodbye Spring, Hello Summer! Friday is my last day. I have a huge stack of books just waiting for me to read.

Keep Reading!

Tuesday, January 7, 2014

Monday Made It - My Snow Edition

I love Monday Made It. It's a great place to get some wonderful ideas for my school or the library.
This month is my snowy edition. Link up with Tara at  4th Grade Frolics for more creative ideas!


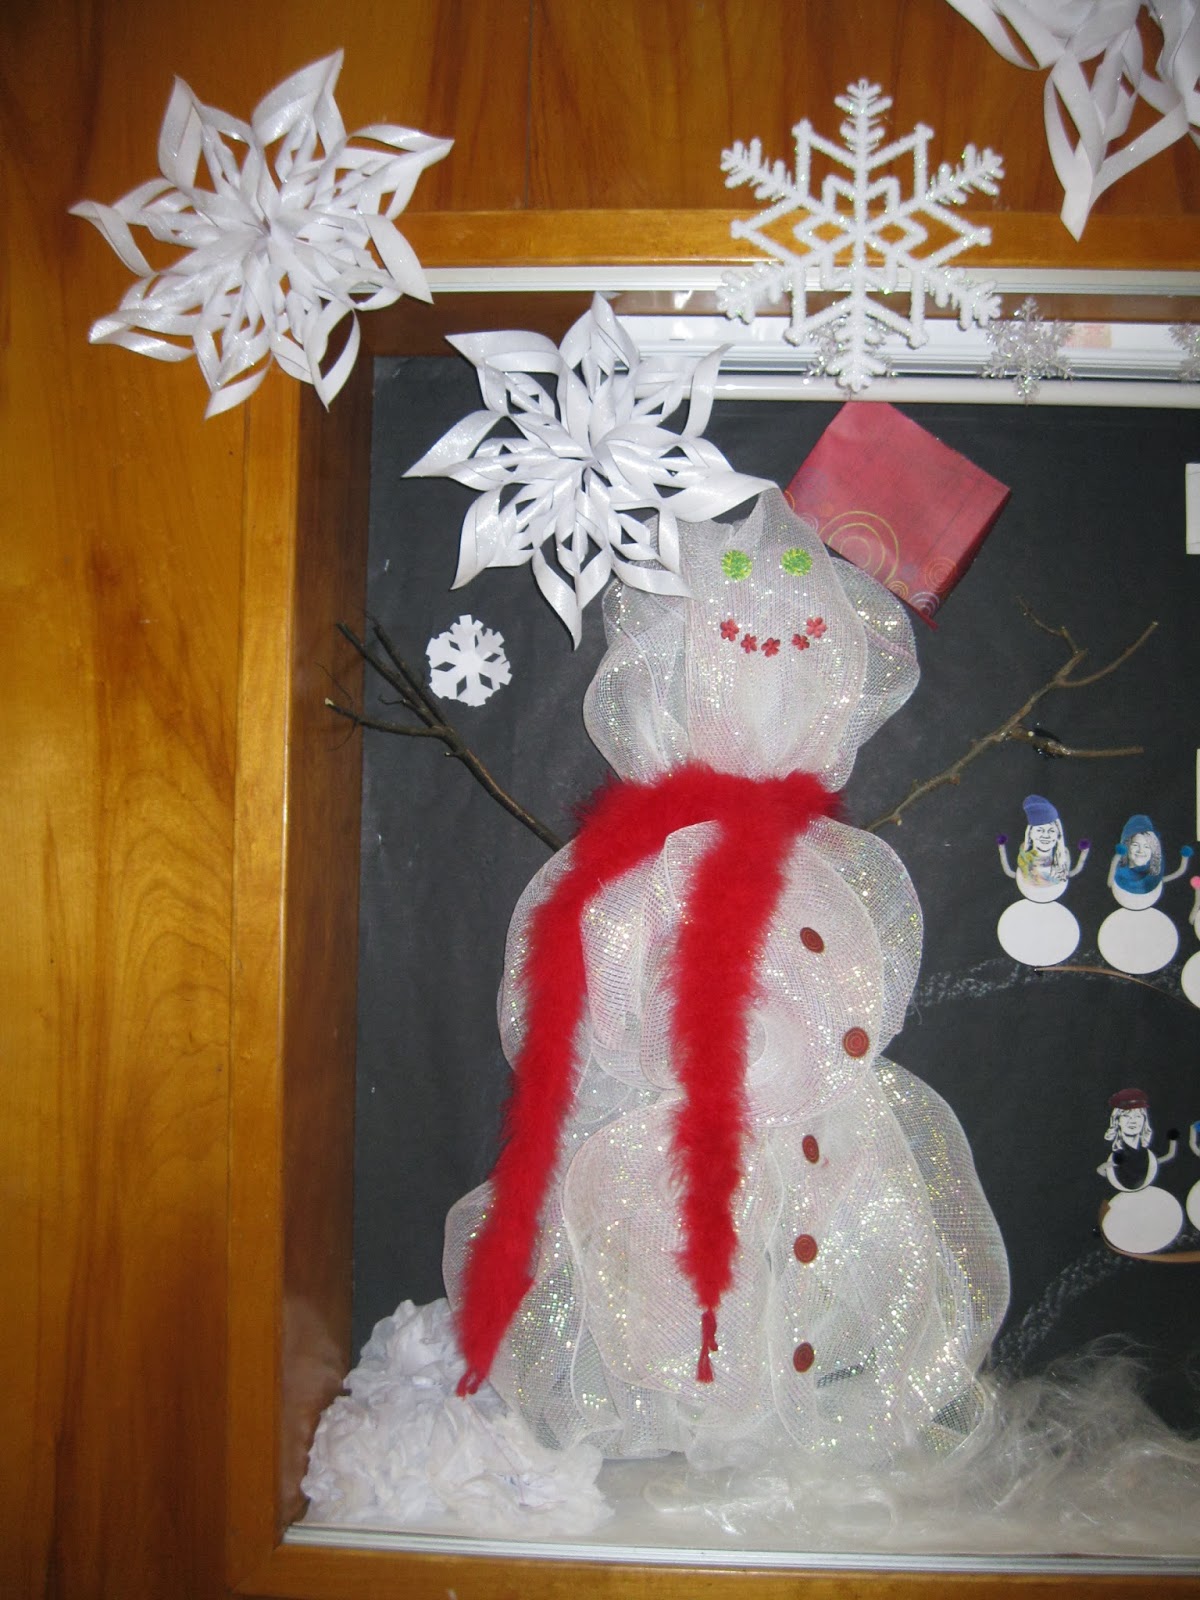
In East Tennessee we don't get a huge amount of snow, so if we get an inch of the fluffy stuff it's a SNOW DAY. In hopes of a few snow days for January and February. I switched the main bulletin board to a snowy theme. (I meant to post pictures yesterday but the snow covered road in front of my house kept this book lady indoors.)

Of course I got the theme "its snow secret" from Pinterest, but I had to put my own little spin on it. Made some 3 D snow flakes (idea from Pinterest). The site included a link to  these simple instructions. They were really easy to make.  I sprayed mine with silver glitter to make them a little sparkly. If I had thought in time, I would have picked up some really cute scrapbook paper from Hobby Lobby. What I had at home or school just wasn't right for my snow board.

I made the snowman out of  deco mesh.  He's not perfect but he'll do. I was too cheap to buy the wreath forms. It probably would have helped keep his shape a little better. I just stapled the mesh to the bulletin board.

The part of the board the kids are going crazy over is the little snow people. Every snow person is a cartoon version of a staff member at school. I have everyone but the bus drivers.... Just didn't get their pictures taken in time or they would have been included.

How did I make my snow people? I'll demonstrate with my photo. Had to be fair and include myself on the board. Took my photo and uploaded to http://cartoonize.net/. With this website you can have a little fun with photos. I cropped my image and focused on the face.


After I cropped the image, I used effect 13. It gave me the look I was going for. I printed it on my black lazer and cut out my head. Then I created little hats and scarfs for each faculty and staff member. In most cases they are wearing their favorite color or something that represents their personality. It was tons of fun to create! I don't get to play with paper dolls very often. I'm usually watching or playing with my boys. (It's all about basketball or baseball at my house. Sometimes they let me play kickball....)


Enjoy your snow day. I should get to go back to school tomorrow.  I just got the phone call no school tomorrow. Good thing I went by the library for more books! Don't forget to check in with 4th Grade Frolics and see what everyone else has been creating.

Keep Reading!


Tuesday, October 29, 2013

Red Ribbon Week 2013

Our school has been busy this past week celebrating "Red Ribbon Week". My little school is  located in upper East Tennessee where there is, unfortunately, a large meth problem. If that isn't enough, our high school students have been dabbling with prescription drugs in the last few years. It is, I fear, a problem growing at an alarming rate! Needless to say, at every opportunity our school encourages and teaches a drug free life style.


Our school is blessed with a school nurse. Nurse Angie organized several activities for Red Ribbon Week. We've dressed in silly socks, our favorite sports team, school color days to name a few of the activities this week. The high light was the door decoration contest. My teachers were very creative in decorating their doors for Red Ribbon Week. (Can you tell we love Pinterest? Ha)

I didn't get pictures of every door. But here are a few of my favorites, in case you need any ideas...


Don't Get Wrapped Up in Drugs!


Bee Drug Free


We Crow No to Drugs


Those Whooo Are Wise Say No to Drugs


Witch Way Will You Fly? Straight or High? 


Being Drug Free Is Spook-tacular!

Don't Do Drugs, Jack!


Don't Get Tangled Up In Drugs

DEAD - Drugs End All Dreams

Fly Away From Drugs!

Keep Reading!!! I will...

Friday, October 25, 2013

Decorating For Fall

I meant to change out the main bulletin board at the beginning of October. I meant to have more books read by the beginning of October. I meant, I meant, I meant!!! October is going by way too fast. I did get our board updated last weekend. Yes, I said weekend. With our first nine weeks ending, and students trying to read extra to ensure meeting their AR goals, I was way too busy to fix it during the week.

I wanted something really special to greet our students as they enter our main hall. Did a quick check on Pinterst and found the following pin at Olson's Crafty Kinders:


Loved Elizabeth Olsen's idea and adapted it into the following:


I thought turned out right cute. The students loved it, which is really all that matters. Have a great fall weekend. They're calling for snow in my East Tennessee mountains. May have to change my leaves to snowflakes a little early this year.

Have a great weekend. Curl up and READ!!!


Monday, August 12, 2013

A Little Library Love with MMI

I missed last week's MMI!  I've loved reading the Monday Made It's this summer. Even when I don't post, I still go and check out everyone's projects. Thanks Tara for hosting a great linky. You never know when someone will have an idea that I might "borrow"!


In the last couple days of craziness before the students arrived, I added a couple little things to the library (my classroom). The biggest project involved my desk. It needed a major face lift. The teacher before me had it painted with red and white strips like "the cat's" hat. It was cute BUT the white strips were starting to look dirty. We won't even mention the clips on the drawers. Did I remember to take a picture? Nope. Besides, I'm going to have to add a few more coats. Anyone painted anything red lately? You will understand my pain. Just trust me, put enough paint on an old teacher desk and it will look better. (It might be holding it together! It's probably the same desk my grandmother used when she taught at my school.) See, you got it with out a picture!


On a few of the many blogs I read this summer, fellow teachers had been jazzing up their pocket charts with duct tape. I had a little zebra print that I thought would look cute. Nope, overkill. Then I found a couple rolls of white with black polka dots ribbon at Wal-Mart. Ribbon + hot glue = Library Cuteness! (And to think Mrs. Taylor thought I wasn't paying attention in Algebra. HA.) Thought it turned out near perfect. Now my objects/standards will be displayed with class! It looks great under my read banner.


I posted last week about my new social media bulletin board. Due to the number of requests for the buttons, I put them in my Google drive. If you are interested, click here. (I missed the Monday Made It's so some of you didn't see it.)


I've been adding the last of my crazy projects to the library this summer with new labels for the shelves. I found a double handful of wooden rulers and painted them red. (Don't fret. They were advertisement rulers that I'm sure came from the fair last year. My State Farm agent would have laughed and maybe sent me more.) I added Dewey labels with some cute clip art. I really want my students to read more non-fiction. I'll try it for a while and see if it works. When I am totally happy with them, I'll load the file to TPT. I like to test everything first.

Is my room/library ready for students? Not totally. The new computers are supposed to arrive sometime this week. No problem. It's close. Not that it really matters at this point. My students started back last week. So far they like all the changes.

Check out Tara's blog for more Monday Made It's!

Keep reading! and have a great year.


Friday, August 9, 2013

Where is Mrs. Brown?

No, I didn't fall off the end of the Earth! School started. Yep, I'm back. (Having flashbacks of Poltergeist!) I've been working really late. You would think that getting ready to start the school year would be easy for librarians. Sometimes. I decided to do a little redecorating and organizing this summer. If you've seen my Monday Made Its, you will have seen tidbits of my madness. I'm so not a girly girl, but now the library has some new book baskets, shelf markers, and shelf labels. Hey, I'll try almost anything to get my darlings into a great book.


As I have mentioned before, I teach at a really SMALL school. Because of our size, I have other jobs besides librarian.  For example, I'm our Technology Support Teacher. (This year our district is renaming my position to Technology Coach. I get to do less fixing of computers and more helping my teachers use technology in their classrooms.) As my school's techie, I help my teachers get their computers set up and make sure everything is running smoothly for the first day of class. Usually this is a one day job. Not so this year. I broke down a lab and moved those computers to the classrooms. We're getting a new mobile lab which I really believe will be better utilized. This resulted in my working a few late nights this week. (I really started a week ago Thursday.) We've also had a couple teachers switch classrooms so I've been trying to help by moving their computers. (And anything else they need. I'm really too nice. Ha!)

In between all the moving around I did get a couple bulletin boards finished. I worked on the main entry way board last week and finished it Wednesday afternoon. My teachers, principal, and kids (so far) have loved it. Of course I used my favorite red. Had to add a little animal print. I thought it looked pretty good. Whoop! Whoop!


To introduce internet safety, I created a THINK bulletin board. I had pinned this from a couple sites back in the spring and knew I wanted to "borrow" the idea. This one took a little bit of time to create because I couldn't find all the social media buttons I wanted to place on my board. With a little time and persistence I created the following buttons for my board. If you can use them, comment below and I'll send you a copy. Make sure your reply by email is on so I'll be able to see your email. Otherwise just email me on my gmail account. (easttennesseebookworm)


Hopefully I can get the last two classrooms set up tomorrow. I'm waiting to see if we get to hire another teacher. Our numbers are sooooooo close.

Keep Reading.... I'll have a little time this weekend.


Monday, March 11, 2013

Read Across America Day


I just love RAAD! At my school it's really Dr. Seuss Day! Of course any day we celebrate reading is an awesome day for me. I'm fortunate enough to work at a school that has a full time reading specialist. Jessica is wonderful. She organized the day wonderfully. I am also our Technology Support Teacher and had 3 new computers arrive so it was great to let someone else be in charge. The teachers, with help from Mrs. Jessica, decorated bulletin boards and really got into the spirit of the day. The school looked wonderful. We had guest speakers, a real cat in the hat, and Dr. Seuss snacks. Several of the teachers dressed up for the day. Everyone had a wonderful day. I have posted a few pictures from the day.

 
That is me on the right!


I got my bulletin board idea from Pinterest of course! I tweaked a door display from Audie's Oddities. The kiddies thought it was funny I put my name on the bulletin board. The flowers all have books on them. I'm going to use the book spines I created in a library center after spring break.

In library we read Dr. Seuss books, of course. I found all kinds of cute center activities on TPT and Pinterest. My favorites were Erin Low’s Dr. Seuss ABC’s  and Lindsay Messner’s Read Across America packet. I even found one for my upper grade students. Yes, 8th graders love Dr. Seuss! I used Name that Dr. Seuss Book from Rachel Lynette. She's so creative. I love picking up her items from TPT.

Hope your Read Across America Day was as terrific as ours! Happy Reading!!!


Related Posts Plugin for WordPress, Blogger...