Image Map
Showing posts with label crafts in the library. Show all posts

Sunday, August 17, 2014

Monday Made It - Puppet Stage

Once again it's time for Monday Made It with Tara from 4th Grade Frolics. I get so excited over seeing everyone's great classroom projects. I incorporate those ideas into projects around my school, my library, and now my niece's classroom. A couple weeks ago I was inspired by  Mr. Greg from Smedley's Smorgasboard of Kindergarten. Greg had made a math tub center from PVC pipe. Now I don't need a math tub center in the library, but I did need a puppet stage.
I was so excited! Off to Lowes I went. Now the sweet little guy at Lowes tried to help me, but looked a little confused when I said I was shopping for parts to build a puppet stage. I should have taken a picture. His reaction - priceless! Must not get many requests for those in the plumbing section.  I should probably get a prize at my local store for asking the oddest questions. (Yes, Mrs. Brown, you can build a puppet theater from PVC pipe!)

After a little experimentation, my finished project!

Just in case anyone wants/needs a puppet stage, here's how I did it.
From Lowes:
Purchased 55 feet of PVC Pipe (5 - ten foot pieces and 1 - 5 foot piece) 8 elbow joints, and 2 T joints. I only need 50 feet of pipe, but after cutting realized I would have 2 odd pieces and be short.  So I purchased one extra short piece.

When I got home, (And yes you can put 5- ten foot pieces of PVC pipe in a Camry!) I sweet talked the oldest teenager into cutting the pipe for me.
 5 - 4 foot pieces
6 - 2 foot pieces
2 - 3 1/2 foot pieces
2 - 5 1/2 pieces
 
Then came the assembling! All joints were elbows except for the two middle joints in the front. For now it's strong enough. The kids can't swing on it or do chin ups, but should be fine for a puppet stage.

 
 I went to Hobby Lobby, found some material I liked and added curtains to the front and sides. I purchased 7 yards of the black and white. Could have used a little more..... 1 yard was plenty for the red. (My sweet mother-in-law did the sewing for me!) Basically, just sew a seam at the top and slide on the pipe like a curtain. Yes, she hemmed all the sides except for the bottom of the front. (I'm a little spoiled!)  I should have purchased a little extra of the black and white.


As for the cost, my Lowes ticket was around $21.00  I spent another 45 dollars on fabric. Yes, I spent a little over $60 on my puppet stage. But, I like it! Love that it's portable. I can easily take it apart when I don't have the puppets out and store it in the library.  If you want a more detailed set of instructions, email me at easttennesseebookworm at gmail.com and I'll be happy to send you a set - with pictures!
 
The kids are going to laugh. It matches my chair perfectly! (Ignore the paperwork, I wanted to get my stage done.) Can't wait to see their faces when they see it this week.
 
 
Have a great week and don't forget to check out other Monday Made It's on Tara's blog - 4th Grade Frolics.

Keep Reading !!!!

Monday, July 28, 2014

Monday Made It - It's a Traffic Light!

It's time for another Monday Made It. This week I made a traffic light for the school's welcome bulletin board. Be sure and check Tara's blog 4th grade Frolics for other great "Made It's".


Saturday I went over to school to work on a couple things for the school's welcome bulletin board. This year the welcome display is going to have a racing theme. “Racing off to a great year!” I have a few more things to make, but those will have to wait till the teachers return. (I need their pictures!) I'll post a picture of the finished display as soon as it's complete. As part of the display I wanted to make a traffic light. I checked the teacher idea box – otherwise known as Pinterest – and found a few ideas. Of course I had to change it up a little. Got to use what’s one hand. My light:


To make my light I used:

3 ice cream buckets from Wal-Mart. The rectangle shape worked great.

White Christmas lights

Black construction paper

Black poster board

Small piece of red, yellow, and green tissue papers

A boat paddle

Bucket of rocks

Lots of hot glue

Duct tape –

Carpet knife and scissors


 Step One:

Duct tape the 3 ice cream buckets together. It doesn’t’ matter what color you use. With the carpet knife I cut hole in the back of the top bucket to feed the Christmas lights into the buckets. I also cut small holes in the bottom of the top and middle sections of the traffic light. The carpet knife sliced the plastic like butter.


Step two:

I took the black poster board and made the front and sides of the traffic light. To make it look like a traffic light, I glued tissue paper on the inside to make it look like a traffic light. I hot glued the poster board to the ice cream tubs and had the top part of my light.

*Hint* If anyone else makes one of these, don’t glue to front of the light on until you have already attached the light to the stand. I had to take it off to connect it to the boat paddle.


Step three:

Create a light pole! I used a boat paddle. That’s what I had. Didn’t figure the boys would use it in the next month or so. If you are going to use this for a long time, use a piece of wood or thick PVC pipe. Mine was meant to be temporary. I wrapped the paddle with black construction paper and scrapes from the bulletin board paper in the library.


Step four:

 I placed the stand (boat paddle) in a bucket, filled it with rocks to make it sturdy. Another mistake I made was attaching the light to the upright paddle.* Hint* I would advise attaching the traffic light to the stand before you place it in the bucket of rocks. I almost burnt a couple fingers in the hot glue. Ice cream buckets are made of very thin plastic. I could feel the hot glue melting the buckets as I attached them to the paddle. Make sure to watch the placement of the cords to the Christmas lights. You want to be able to plug them in after all this hard work. My finished traffic light!!!  I'll tape the extension cord to the back. It will only be on during open house or special occasions. Don’t want to get into trouble with the fire marshal.


Go check out other great Monday Made It’s on Tara’s blog! Might find something you just have to make for your library or classroom.

I need to go by school and shelf those books. That was my "read it"  stack from last week.

Friday, July 25, 2014

It's a Fabulous Friday! And the winner is....

My Friday has started off to be fabulous! I have a winner for the Genre Subway Art! Giving things away is so much fun.


Congratulations to Karen B! Look for my email. This was so much fun I might have to have a giveaway more often.  I'm actually working on my Monday Made It. What about a little fun for the weekend? Who can guess what I'm making for my latest bulletin board? I posted this picture last night on Instagram.
*Hint* 3 ice cream tubs, Christmas lights, poster board, duct tape and of course it will involve the hot glue gun!

 Leave me a comment and I'll send a $5 TPT gift card to whomever guesses correctly first. Your guess must be posted by Midnight (Eastern Standard Time) Saturday. My MMI usually goes live Sunday night.

Sunday, July 20, 2014

Monday Made It - Genre Display and a Giveaway!

I'm so excited to have another post for Monday Made It. Check out other great creations on Tara's blog 4th grade Frolics.  Yes, I know it's Sunday, but this is going to be a busy week.

I went by school and fixed a new display for the library. (This idea could easily be used in a classroom reading corner.)  My students are in a reading rut! They like to read the same old stuff over and over. I want my students to branch out to new authors and genres. To help them do this I'm going to have a genre of the month club.

New bulletin board and genre display! I didn't have a bulletin board on this wall, so I faked it! Hot glued black paper up, added cute boarder and instant bulletin board. If  this program is successful, I'll order a real bulletin board for the wall. I even added a place for the students to recommend books to other students. Hung some dust jackets and pictures of books for cheap decorations. I'll change those monthly with each new genre. Going to start the year off with Mystery. Yes, those clips are the cheap ones from Dollar Tree. (Supposed to chip bag clips.... They are strong enough to hold paper.)


(Might have to switch this basket for a black one. My red's don't match... I'm probably the only one who notices.)


I wanted some cute letters for a heading and had a "brain blast". My READ banner is just a few feet over what if I had a genre banner to match? Duh... I created a little banner to hang above the new display. I thought it turned out great. Added two black poms for a little pop.


I  saw a cool mini anchor chart stand on "Falling Into First's" blog. (Thank you, Stephanie!) The post included directions. Insert big gigantic light blub! I had genre posters hanging in the library. These are from Primary Paradise's Spectacular Story Elements. LOVE THEM! What if I displayed them on a stand? Maybe my students would actually read them. trip to Lowes, little help from the teenager in cutting PVC pipe, little duck tape (redneck engineering teacher creativeness...) = cute anchor chart stand.  I had to add some red or black, hence the red duct tape. I did change the feet to make mine sturdier.  

Side note: I liked it so much, I picked up supplies to make another one for behind my desk.


Finally, my display would not be complete without some art from Catherine Reed - The Brown Bag Teacher. She has this amazing subway art set featuring - you guessed it - GENREs! They look great on my new genre display. Instead of laminating them, I hot glued a page protector to the wall. The florescent lighting in the library puts a glare on anything hung near the lights. Now I can just swap them out each month. Wouldn't they look great in frames or mounted on colored cardstock? Would you like to win a set? The wonderfully sweet Catherine has donated a set for me to give away. Enter below!!!
 
 
I think it turned out great! Can't wait for the students to see it. Ignore the glare. I was on the dumb phone which won't let me remove glare. I so need an upgrade....


Don't forget to enter for a set of genre subway art from the Brown Bag Teacher! I'll announce the winner on Friday. What a way to start the weekend!
 
 
a Rafflecopter giveaway
 
Be sure and check out other great Monday Made It's on 4th Grade Frolics. I have less than 2 weeks to get everything ready for the new school year. I'm back full time July 30th. (That's what happens when you get out on May 23rd.  My district tries to end the year before Memorial Day in case of extra snow days.)
 

Take a break and read a book,


Sunday, July 13, 2014

Monday Made It - Reading Displays

Monday Made It's are so fun to read! I've been pinning and getting all kinds of ideas. Be sure and check out other great Monday Made It's with Tara at 4th Grade Frolics.
I finally put my book down and got busy creating for the library. I fell in love with the little frames from IKEA I had seen in other great posts. The closest IKEA store is 3 1/2 hours from my house. NOT going there... Yes, I know I can shop online, but I spend way too much at Amazon... Finally, someone posted the frames were at Michaels. Now that I can do! Michael's is only an hour away. Needed a great excuse to go to Barnes and Noble (across the street!). I found several colors that I just had to purchase! They were on sale and I could use a teacher discount.... couldn't resist.
Project One -
This is what I had originally wanted needed the frames for:


My new table labels. The ones in the red frame are gong in my library. The black framed ones are for a fellow librarian.  I created the labels in mostly black and white to make them a little more ink friendly. If you can use them, feel free to download them. They are labeled Table 1 - 10 and Group 1- 10. I forgot if Jennifer wanted table or group numbers for her library. Please leave me a little love just to let me know you could use them! The horizontal labels (red frame) are here, while the vertical labels (black frames) are here.


I didn't stop there! I made printed a few quotes to display around the library. They are all lines from children's literature. I'm going to swap them out throughout the year. Sorry the photographer needs to work taking on anti glare pictures!

If you can use these, they are found on TPT. Yes, free. Just leave me a little feedback. I'd appreciate it! I love making things for my reading buddies.

Next and final project for the week:  (There was a book calling out to be read!)
Remember I said I found several colors.... These are for a couple of the girls down the hall. I won't name names just in case they happen to read this. I want to create a couple/few more for my other special teaching buddies. Oh well, another trip to Michaels and Barnes and Noble....... :)


I think they will look really cute on their desks! Don't' forget to check out other MMI's on Tara's blog at 4th Grade Frolics.

Keep Reading!!!


Tuesday, January 7, 2014

Monday Made It - My Snow Edition

I love Monday Made It. It's a great place to get some wonderful ideas for my school or the library.
This month is my snowy edition. Link up with Tara at  4th Grade Frolics for more creative ideas!


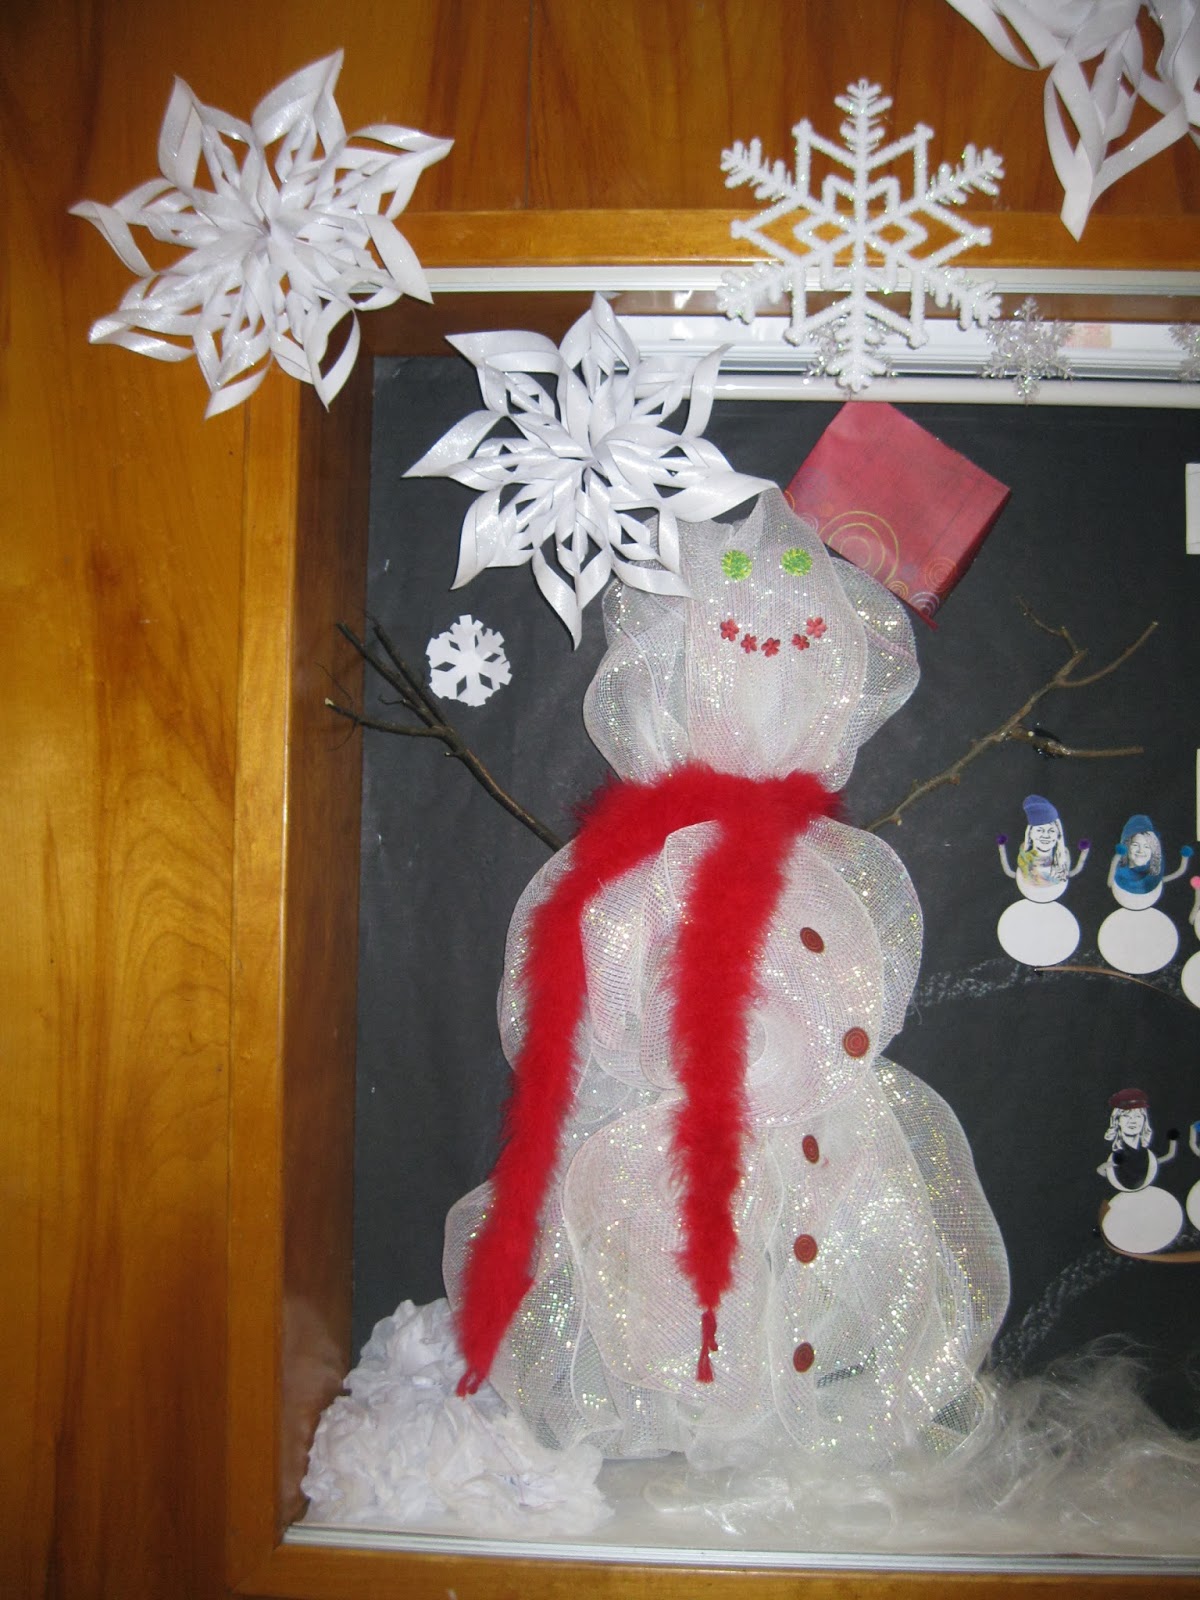
In East Tennessee we don't get a huge amount of snow, so if we get an inch of the fluffy stuff it's a SNOW DAY. In hopes of a few snow days for January and February. I switched the main bulletin board to a snowy theme. (I meant to post pictures yesterday but the snow covered road in front of my house kept this book lady indoors.)

Of course I got the theme "its snow secret" from Pinterest, but I had to put my own little spin on it. Made some 3 D snow flakes (idea from Pinterest). The site included a link to  these simple instructions. They were really easy to make.  I sprayed mine with silver glitter to make them a little sparkly. If I had thought in time, I would have picked up some really cute scrapbook paper from Hobby Lobby. What I had at home or school just wasn't right for my snow board.

I made the snowman out of  deco mesh.  He's not perfect but he'll do. I was too cheap to buy the wreath forms. It probably would have helped keep his shape a little better. I just stapled the mesh to the bulletin board.

The part of the board the kids are going crazy over is the little snow people. Every snow person is a cartoon version of a staff member at school. I have everyone but the bus drivers.... Just didn't get their pictures taken in time or they would have been included.

How did I make my snow people? I'll demonstrate with my photo. Had to be fair and include myself on the board. Took my photo and uploaded to http://cartoonize.net/. With this website you can have a little fun with photos. I cropped my image and focused on the face.


After I cropped the image, I used effect 13. It gave me the look I was going for. I printed it on my black lazer and cut out my head. Then I created little hats and scarfs for each faculty and staff member. In most cases they are wearing their favorite color or something that represents their personality. It was tons of fun to create! I don't get to play with paper dolls very often. I'm usually watching or playing with my boys. (It's all about basketball or baseball at my house. Sometimes they let me play kickball....)


Enjoy your snow day. I should get to go back to school tomorrow.  I just got the phone call no school tomorrow. Good thing I went by the library for more books! Don't forget to check in with 4th Grade Frolics and see what everyone else has been creating.

Keep Reading!


Related Posts Plugin for WordPress, Blogger...